Overview |
...
When accessing the Hosts Configuration Page, Administrators see an Host Table, listing all Hosts objects.
This table contains the following informations :
- Differences
- Name
- Description
- Address
- Realm
- PollerTag
- Host Template
- Sources
- Status
...
 | |
This page |
...
provides, on the left, an action Menu, used to :
|
...
|
...
On the top of the table, A tool bar let Administrators the ability to :
| |
Create a new Host | |
...
| See chapter Create a |
...

...
Host creation form will be displayed.
This form is composed of tabs, corresponding to categories of properties :
Generic
Data
Monitoring
Checks
Notifications
Advanced
...
The left menu give to Administrators the ability to :
- Validate the new host
- Cancel the action
- Delete the host
...
For each category, a corresponding form is displayed.
Generic
Generic properties contains the minimum properties requiered to create an Host :
...
the name of the Host
this field is requiered
...
- extended description, displayed in Host Widget
- Name is used if nothing is filled
...
- address used to join the host on the network
- can be an IP Address, or a resolvable hostname (Short or FQDN)
...
- list of templates the new host should herit to
- templates name are suggested when starting to fill the field
...
- a list of available Hostgroups the new host should be in
- more than one hostgroup can be selected
...
- realm from which the host should be monitored
- only one choice can be made
...
- the priority is a feature used to show the criticality level of hosts
- there is no impact on check method or notifications
- by default, level of Host Template is used
...
- this field is used to determine hosts located between poller and the new Host
- filling this property helps in problem resolution, and in impact calculation
...
Data | |
Data is used to show and create variables used by Shinken to perform checks. Those values are also called Macros. As shown on the picture, when creating a new host, no data are available, even if the new host inherit from Template.
| |
| To see data that will be applied to host, it is necessary to first validate the new host, and come-back to its configuration. |  |
Data are displayed in two sections :
Data from templates are seperated by template names. This allow Administrators to see what and where data have been get. Data are represented by a Key and a Value. When data are local, both of them can be modified. When data are inherited, only values can be modified. | 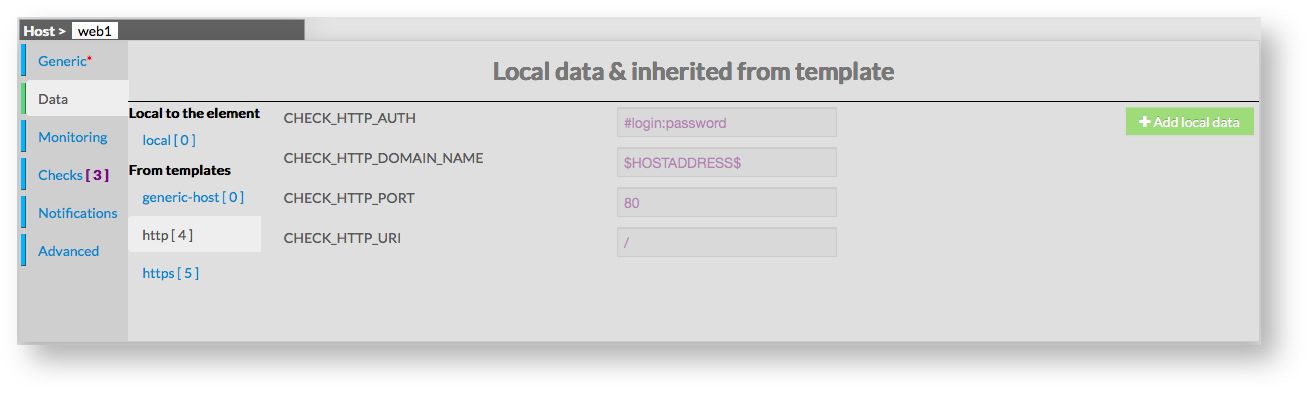 |
Monitoring
This form is used to configure properties that define monitoring for the host itself. Monitoring is defined by the following properties :
|  |
...
Checks
...
Checks is a read-only form, used to provide informations about checks (services) that will be made for the host.
By default, if no template applies on host, no check will be made.
...
If the host inehrits from a template which has services attached to it, checks will be filled with the description of those services.
In this example, we can see 3 checks, inherited from http template, and https template. Checks are displayed in tables, showing the following :
- Name of the Check
- Contacts Groups for the Check
- Host templates using the Check
- Check Command used
- A "Try this check" action, allowing to try the check before validating
...
| Host for more details. | |||
Modify a host | |||
To modify properties of a host:
|  | ||
The form displayed is the same as the form used to create a new Host.
|  | ||
Delete a hostTo delete a host, you can use the form of the host, or delete it directly from the list page. | |||
From the Form pageFirst go to the Hosts page, from the Main menu,then click on the host name you want to delete. Once in the page displaying the form, click on the Delete button available on the left menu. A confirmation popup will be displayed. |  | ||
From the main pageFirst go to the Hosts page, from the Main menu, then click on the check box placed on the first column of the table. Use the Action menu on the top to select Delete, and click to the Launch Button. A confirmation popup will be displayed.
|
| ||
Duplicate a host | |||
Duplication operation is very useful when similar Hosts must be added. To duplicate a host, first go on the Main page listing all hosts, then select a host by clicking on the check box placed on the first column. |
| ||
Once selected, the host can be duplicated by selecting Duplicate in the select Action
Duplication is executed by clicking the Launch button. |  | ||
The name of host duplicated is suffixed by "(copy)".
|  | ||
Using the Main page gives Administrators ability to Dublicate many Hosts at once. Note: Duplicated Hosts are totaly detached and independant of the cloned Host. No relation is made in the configuration. | |||
Enable / Disable a HostDisable operations help Administrators to temporarly exclude an element from the monitoring. It can be very helpfull to prepare a future configuration. Enabling or Disabling Host can be made from the Host Configuration, or from the Main Hosts page. | |||
From the Host configuration
Once in the page displaying the form, modify the Enabled property
|  | ||
From the Main pageFirst go to the Hosts page, from the Main menu, then click on the check box placed on the first column of the table. |
| ||
Use the Action menu on the top to select Disable, and click to the Launch Button.
|
| ||
In both cases, the result will be displayed in the table listing all Hosts. |
| ||
To Enable one or more Hosts, use the same procedure, by Choosing Enable. Using the Main page gives Administrators ability to Disable or Enable many Hosts at once. | |||
See and apply differences proposed by the Automatic detection modulesDifferences are generated from the configuration daemon when an host is already validate in the configuration and that the Automatic configuration modules (Sources and Taggers) did detect new properties (like custom data or new templates) | |||
When an host have such a differences, a green square will be shown on the "Differences" collumn. |  | ||
Moving your mouse over the square lets you see all proposed differences. Here the VMWare discovery module did find the JIRA host in the 172.18.206.51 ESX server, and it proposes to add the vmware-vm template to this host. |  | ||
| If you agree with the difference, select the host: |  | ||
And click on the button "Accept selected differences [ 1 ]". The value in brackets depends on number of selected hosts containing differences. By clicking on the button, you will accept the differences for all the selected hosts. |
| ||


Notifications
Advanced
...